Hebrew version · English chapter index
This is the first stage of the project. We start with the starter project already created in Android Studio and finish with a running app that displays a static board: a red target in the center and three green circles. There is no gameplay, dragging, or running timer yet; we will add those in the next stages.
If you are creating the project yourself, choose the Empty Views Activity template and keep the Activity name MainActivity. Edit the files created by the template; there is no need to add another Activity.
Name the project exactly CollectCircles, including capitalization. Enter this name in the Name field when creating the project. Make sure the Package name field contains exactly com.example.collectcircles. If you started with a different name, create a new project with the correct name before continuing. Renaming an existing project can take a student 30–60 minutes; at this early stage, starting again is easier. Before changing any code, enable Git and create an initial commit by following these steps.
0. Share the project on GitHub and save the starting state
Before switching to View Binding, share the project on GitHub using the menu. Sharing enables Git, creates an initial commit (a saved checkpoint of your code), and uploads the project to GitHub.
- In the top bar, next to the project name
CollectCircles, choose Version Control → Share Project On → GitHub…. - If login is required, select Log In via GitHub and complete the login in the browser.
- In the sharing window, name the repository
CollectCircles, keep the remote nameorigin, and click Share. Select Private if access to the repository should be restricted. - In the Add Files for Initial Commit window, make sure the project files are selected, enter a message such as
Initial CollectCircles project, and confirm. Keep the.gitignorefiles created by the template;build/,.gradle/, andlocal.propertiesshould stay out of the commit. - Once sharing is complete, open the GitHub repository link and check that the project files and initial commit are present.
The starting state is now saved in Git and GitHub, and you can begin changing the code. Once your change builds and runs successfully, create another commit with a message describing it, for example Enable View Binding, and use Git → Push to update GitHub too.
In CollectCircles, the exact package name also matters for the notification chapters. The package name com.example.collectcircles entered when creating the project also becomes Gradle’s applicationId: the “Android package name” checked by Firebase. In the advanced notification chapters, the app calls serverless functions prepared by the teacher. These accept only the app registered with this package name. A different project or package name will cause requests to be rejected. If you have just started with a different name, creating a new project with the correct name is preferable. Important: choose min SDK 31; if you forgot, you can adjust it later.
What you will learn
- How XML and Java connect with View Binding.
- How to create a
Viewthat draws itself withCanvas. - How the
Circleclass brings together shared data and methods. - How
Target extends Circleadds behavior using inheritance and@Override. - The difference between two circles overlapping and a circle being fully contained in the target.
We will build the game in three layers. XML determines where the game board sits; Circle and Target describe what is drawn and its geometry rules; GameBoardView knows how Android draws the model on screen. This separation matters: later, we can change the game state without rebuilding all the screen components.
Converting the project to View Binding
View Binding generates a class with direct references to the Views in the XML file, so you no longer need to look up each component using findViewById. This makes the code shorter and catches incorrect IDs and type conversions earlier.
Step 1 — Enabling View Binding in Gradle
Open build.gradle.kts (Module :app) and add buildFeatures:
 android {
     namespace = "com.example.collectcircles"
     compileSdk {
         version = release(36)
     }

+    buildFeatures {
+        viewBinding = true
+    }
+
     defaultConfig {
         ...
     }
 }
After editing, sync Gradle  .
.
Step 2 — Convert MainActivity to use Binding
Edit MainActivity.java:
Before
@Override
protected void onCreate(Bundle savedInstanceState) {
    super.onCreate(savedInstanceState);
    EdgeToEdge.enable(this);

    setContentView(R.layout.activity_main);
    ViewCompat.setOnApplyWindowInsetsListener(findViewById(R.id.main), (v, insets) -> {
        Insets systemBars = insets.getInsets(WindowInsetsCompat.Type.systemBars());
        v.setPadding(systemBars.left, systemBars.top, systemBars.right, systemBars.bottom);
        return insets;
    });
}
After
@Override
protected void onCreate(Bundle savedInstanceState) {
    super.onCreate(savedInstanceState);
    EdgeToEdge.enable(this);
    binding = ActivityMainBinding.inflate(getLayoutInflater());
    setContentView(binding.getRoot());
    ViewCompat.setOnApplyWindowInsetsListener(binding.main, (v, insets) -> {
        Insets systemBars = insets.getInsets(WindowInsetsCompat.Type.systemBars());
        v.setPadding(systemBars.left, systemBars.top, systemBars.right, systemBars.bottom);
        return insets;
    });
}
The binding field appears in red. Choose right-click > ShowContextActions, then Create Field:
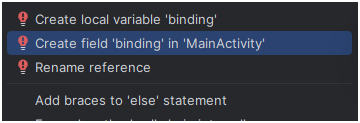 This adds both the field and the missing import.
Brief explanation: binding.getRoot() is the root View of the layout. binding.main accesses the View with android:id="@+id/main", so findViewById is no longer needed. The insets and padding code stays unchanged.
2. Create Circle
In the Android window, under app > kotlin+java > com.example.collectcircles, create a Java Class named Circle. Each circle stores its center, radius, and color:
Blocks beginning with /** are Javadoc: documentation that Android Studio displays in code completion and Quick Documentation. The @param and @return tags tell callers which values a method accepts and what it returns. Reserve // comments for implementation details inside the method.
package com.example.collectcircles;

import android.graphics.Canvas;
import android.graphics.Paint;

public class Circle {
    private float centerX;
    private float centerY;
    private final float radius;
    private final int color;

    /**
     * Creates a circle with the given position, size, and color.
     *
     * @param centerX Position of the center of the circle on the horizontal axis
     * @param centerY Position of the center of the circle on the vertical axis
     * @param radius The radius of the circle
     * @param color The color of the circle
     */
    public Circle(float centerX, float centerY, float radius, int color) {
        this.centerX = centerX;
        this.centerY = centerY;
        this.radius = radius;
        this.color = color;
    }

    /**
     * @return The position of the center of the circle on the horizontal axis
     */
    public float getCenterX() {
        return centerX;
    }

    /**
     * @return The position of the center of the circle on the vertical axis
     */
    public float getCenterY() {
        return centerY;
    }

    /**
     * @return The radius of the circle
     */
    public float getRadius() {
        return radius;
    }

    /**
     * Moves the circle’s center to a new point.
     *
     * @param centerX The position of the new center on the horizontal axis
     * @param centerY The position of the new center on the vertical axis
     */
    public void setCenter(float centerX, float centerY) {
        this.centerX = centerX;
        this.centerY = centerY;
    }

    /**
     * Calculates the distance between this circle’s center and another circle’s center.
     *
     * @param other The other circle
     * @return The distance between the centers of the circles
     */
    public double distanceTo(Circle other) {
        return distanceTo(other.centerX, other.centerY);
    }

    /**
     * Calculates the distance between the circle’s center and a given point.
     *
     * @param pointX The position of the point on the horizontal axis
     * @param pointY The position of the point on the vertical axis
     * @return The distance from the center of the circle to the point
     */
    public double distanceTo(float pointX, float pointY) {
        float dx = centerX - pointX;
        float dy = centerY - pointY;
        return Math.sqrt(dx * dx + dy * dy);
    }

    /**
     * Checks whether a point is inside the circle or on its circumference.
     *
     * @param pointX The position of the point on the horizontal axis
     * @param pointY The position of the point on the vertical axis
     * @return {@code true} if the point is inside the circle or on its circumference
     */
    public boolean contains(float pointX, float pointY) {
        return distanceTo(pointX, pointY) <= radius;
    }

    /**
     * Checks whether this circle and another circle share an area.
     *
     * @param other The other circle
     * @return {@code true} if the circles overlap
     */
    public boolean overlaps(Circle other) {
        return distanceTo(other) < radius + other.radius;
    }

    /**
     * Draws the circle on the given canvas.
     *
     * @param canvas the canvas
     * @param paint the color and style settings used for drawing
     */
    public void draw(Canvas canvas, Paint paint) {
        paint.setStyle(Paint.Style.FILL);
        paint.setColor(color);
        canvas.drawCircle(centerX, centerY, radius, paint);
    }
}
One geometric idea, three different tests
We calculate the distance between two points using the Pythagorean theorem. If the circle centers are (x1, y1) and (x2, y2), the horizontal and vertical differences form the two perpendicular sides of a right triangle. The length of the line segment joining the centers is therefore:
dx = x1 - x2
dy = y1 - y2
distance = sqrt(dx * dx + dy * dy)
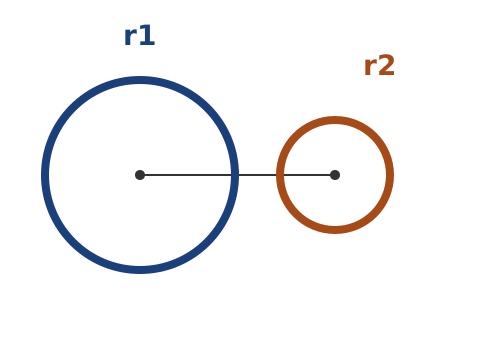
In the diagram, d always measures the distance between the centers. r1 and r2 measure from each center to its circumference. The same d helps answer three questions, but their conditions are not interchangeable:
| Question | Condition | Method | Use in the game |
|---|---|---|---|
| Is the touch point inside a circle? | d <= r1 |
contains(x, y) |
Selecting the touched circle |
| Do two circles overlap? | d < r1 + r2 |
overlaps(other) |
Creating a starting layout without overlapping circles |
| Is the small circle completely inside the target? | d + r2 <= r1 |
fullyContains(circle) |
Collecting a circle when released |
When testing a touch point, imagine the point as a circle with a radius of zero. The code uses <=, so touching exactly on the circumference counts as touching the circle. For the overlap test, however, we chose <: when d == r1 + r2, the circumferences touch at just one point and share no area. In this case, overlaps returns false.
You can also picture the overlap test: from each center, move toward the other center by the length of its radius. If the sum of these two distances exceeds d, the circles overlap.
3. Create Target extends Circle
The target is a circle, and it also knows how to draw a cross and check for full containment. Instead of duplicating all the code of Circle, we will use inheritance. In the same package, create a Java Class named Target:
package com.example.collectcircles;

import android.graphics.Canvas;
import android.graphics.Paint;

public class Target extends Circle {
    private final int crossColor;
    private final float crossStrokeWidth;

    /**
     * Creates a circular target with a cross drawn at its center.
     *
     * @param centerX the target center’s horizontal position
     * @param centerY the target center’s vertical position
     * @param radius The radius of the target
     * @param color The color of the target
     * @param crossColor The color of the cross
     * @param crossStrokeWidth The thickness of the cross strokes
     */
    public Target(float centerX, float centerY, float radius, int color,
                  int crossColor, float crossStrokeWidth) {
        super(centerX, centerY, radius, color);
        this.crossColor = crossColor;
        this.crossStrokeWidth = crossStrokeWidth;
    }

    /**
     * Checks if a circle is fully inside the target.
     *
     * @param circle The circle to check
     * @return {@code true} if the entire circle is inside the target
     */
    public boolean fullyContains(Circle circle) {
        return distanceTo(circle) + circle.getRadius() <= getRadius();
    }

    /**
     * Draws the target’s body and the cross at its center.
     *
     * @param canvas the canvas
     * @param paint the color and style settings used for drawing
     */
    @Override
    public void draw(Canvas canvas, Paint paint) {
        super.draw(canvas, paint);

        paint.setStyle(Paint.Style.STROKE);
        paint.setStrokeWidth(crossStrokeWidth);
        paint.setColor(crossColor);

        canvas.drawLine(
                getCenterX(), getCenterY() - getRadius(),
                getCenterX(), getCenterY() + getRadius(), paint
        );
        canvas.drawLine(
                getCenterX() - getRadius(), getCenterY(),
                getCenterX() + getRadius(), getCenterY(), paint
        );
    }
}
super(...) calls the Circle constructor. Inside draw, super.draw(...) first draws the red circle’s body, then we draw two white lines. @Override asks the compiler to verify that we are overriding a method that exists in the parent class.
Overlap and full containment are not the same test. For overlap, distance < r1 + r2 is enough. For a small circle to be entirely within the target, its far edge must also remain within the target radius: distance + smallRadius <= targetRadius.
Why is checking distance < targetRadius insufficient? It only proves that the small circle’s center is inside the target. If the center is close to the rim of the target, part of the circle still sticks out. The furthest point of the small circle is at a distance distance + smallRadius from the center of the target, so it is precisely that which should be compared to targetRadius.
For example, if the radius of the target is 100, the radius of the circle is 30, and the distance between the centers is 80, the center is indeed inside the target (80 < 100) and there is an overlap. And yet the far end is at distance 110, so the circle is not fully contained. Only when d <= 70 is the whole circle inside.
4. Create a board that draws itself
Preparations
Add to strings.xml:
<string name="game_title">Speed Collector</string>
<string name="elapsed_time_initial">Time: 0.000 s</string>
<string name="best_time_initial">Best: —</string>
<string name="start">Start</string>
And add to colors.xml:
<color name="screen_background">#FFFDFB</color>
<color name="board_background">#F2EDFF</color>
<color name="title_purple">#6A3DA3</color>
<color name="time_brown">#795548</color>
<color name="target_red">#E53935</color>
<color name="target_cross">#FFFFFFFF</color>
<color name="circle_green">#43A047</color>
Creating the board
In the same package, create a Java Class named GameBoardView. On Android there is no need to emulate MAUI’s separation between GraphicsView and IDrawable: a class that inherits from View can be the drawing surface itself.
The key parts of the class are:
public class GameBoardView extends View {
    private static final float TARGET_RADIUS_DP = 64f;
    private final Paint paint = new Paint(Paint.ANTI_ALIAS_FLAG);
    private Target target;
    private Circle[] previewCircles = new Circle[0];

    /**
     * Creates a game board from Java code.
     *
     * @param context The context in which the board is running
     */
    public GameBoardView(Context context) {
        this(context, null);
    }

    /**
     * Creates a game board from XML.
     *
     * @param context The context in which the board is running
     * @param attrs the attributes read from the XML
     */
    public GameBoardView(Context context, AttributeSet attrs) {
        this(context, attrs, 0);
    }

    /**
     * Creates a game board from XML with a default style.
     *
     * @param context The context in which the board is running
     * @param attrs the attributes read from the XML
     * @param defStyleAttr The style attribute to be applied by default
     */
    public GameBoardView(Context context, AttributeSet attrs,
                         int defStyleAttr) {
        super(context, attrs, defStyleAttr);
        setBackgroundColor(color(R.color.board_background));
    }

    /**
     * Adjusts the target and preview circles to the board’s new dimensions.
     *
     * @param width the new board width in pixels
     * @param height the new board height in pixels
     * @param oldWidth the previous board width in pixels
     * @param oldHeight the previous board height in pixels
     */
    @Override
    protected void onSizeChanged(int width, int height,
                                 int oldWidth, int oldHeight) {
        float centerX = width / 2f;
        float centerY = height / 2f;
        float targetRadius = Math.min(
                dp(64f),
                Math.min(width, height) / 5f
        );
        float circleRadius = targetRadius / 2f;

        target = new Target(
                centerX, centerY, targetRadius,
                color(R.color.target_red),
                color(R.color.target_cross),
                dp(2f)
        );

        previewCircles = new Circle[] {
                new Circle(circleRadius * 1.5f, circleRadius * 1.5f,
                        circleRadius, color(R.color.circle_green)),
                new Circle(width - circleRadius * 1.5f, circleRadius * 2.2f,
                        circleRadius, color(R.color.circle_green)),
                new Circle(circleRadius * 1.8f, height - circleRadius * 1.7f,
                        circleRadius, color(R.color.circle_green))
        };
    }

    /**
     * Draws the target and preview circles on the board.
     *
     * @param canvas The drawing surface provided by the Android system
     */
    @Override
    protected void onDraw(Canvas canvas) {
        super.onDraw(canvas);
        if (target == null) {
            return;
        }

        target.draw(canvas, paint);
        for (Circle circle : previewCircles) {
            circle.draw(canvas, paint);
        }
    }

    /**
     * Converts dp units to pixels using the screen density.
     *
     * @param value The size in dp units
     * @return The corresponding size in pixels
     */
    private float dp(float value) {
        return value * getResources().getDisplayMetrics().density;
    }

    /**
     * Reads a color value from the app’s resources.
     *
     * @param colorResource ID of the color resource
     * @return the color value that can be used for drawing
     */
    private int color(int colorResource) {
        return ContextCompat.getColor(getContext(), colorResource);
    }
}
- Add/leave
package com.example.collectcircles;at the top of the file - Add the imports of
Context,Canvas,Paint,View,AttributeSet,View, andContextCompat. (Add an import for any component shown in red.)
The three constructors allow Android to create the View from XML as well. dp(...) converts density-independent units to pixels, and color(...) reads a color from resources instead of hardcoding it in Java. onSizeChanged adjusts the objects to the board’s actual size. onDraw receives a Canvas, Android’s drawing surface. Paint controls the drawing color and style, and ANTI_ALIAS_FLAG smooths the circle edges.
Notice the division of responsibilities: Circle.draw knows what one circle looks like, while GameBoardView.onDraw knows the order in which to draw all the objects. We do not store image pixels. We store state—centers, radii, and colors—and redraw from it whenever Android requests it.
The positions are deliberately fixed at this stage. This lets you test the drawing before adding randomness and game state.
Intermediate check
Choose Build → Assemble Project to check that the custom class builds. If you press Run before adding GameBoardView to the XML in section 5, you will still see Hello World!. That is expected: we have built the drawing class, but the screen still uses the template layout. Once we add GameBoardView to the XML, we can check its drawing on screen.
5. Build the screen in XML
Want to learn how to build the same screen by dragging and connecting constraints with the mouse? Go to CollectCircles 1a - Building the screen with Layout Editor. You can do the optional lesson now or come back to it later.
Replace the contents of activity_main.xml. The screen contains a title, two time labels, a button and a game board that takes up the rest of the height:
<?xml version="1.0" encoding="utf-8"?>
<androidx.constraintlayout.widget.ConstraintLayout
    xmlns:android="http://schemas.android.com/apk/res/android"
    xmlns:app="http://schemas.android.com/apk/res-auto"
    xmlns:tools="http://schemas.android.com/tools"
    android:id="@+id/main"
    android:layout_width="match_parent"
    android:layout_height="match_parent"
    android:background="@color/screen_background"
    android:paddingHorizontal="20dp"
    tools:context=".MainActivity">

    <TextView
        android:id="@+id/titleText"
        android:layout_width="0dp"
        android:layout_height="wrap_content"
        android:layout_marginTop="20dp"
        android:gravity="center"
        android:text="@string/game_title"
        android:textColor="@color/title_purple"
        android:textSize="26sp"
        android:textStyle="bold"
        app:layout_constraintEnd_toEndOf="parent"
        app:layout_constraintStart_toStartOf="parent"
        app:layout_constraintTop_toTopOf="parent" />

    <TextView
        android:id="@+id/elapsedTimeText"
        android:layout_width="0dp"
        android:layout_height="wrap_content"
        android:layout_marginTop="12dp"
        android:gravity="start"
        android:text="@string/elapsed_time_initial"
        android:textColor="@color/time_brown"
        android:textSize="16sp"
        app:layout_constraintEnd_toStartOf="@id/bestTimeText"
        app:layout_constraintStart_toStartOf="parent"
        app:layout_constraintTop_toBottomOf="@id/titleText" />

    <TextView
        android:id="@+id/bestTimeText"
        android:layout_width="0dp"
        android:layout_height="wrap_content"
        android:gravity="end"
        android:text="@string/best_time_initial"
        android:textColor="@color/title_purple"
        android:textSize="16sp"
        app:layout_constraintBaseline_toBaselineOf="@id/elapsedTimeText"
        app:layout_constraintEnd_toEndOf="parent"
        app:layout_constraintStart_toEndOf="@id/elapsedTimeText" />

    <com.google.android.material.button.MaterialButton
        android:id="@+id/startButton"
        android:layout_width="0dp"
        android:layout_height="wrap_content"
        android:layout_marginTop="12dp"
        android:text="@string/start"
        android:textSize="18sp"
        app:cornerRadius="14dp"
        app:layout_constraintEnd_toEndOf="parent"
        app:layout_constraintStart_toStartOf="parent"
        app:layout_constraintTop_toBottomOf="@id/elapsedTimeText" />

    <com.example.collectcircles.GameBoardView
        android:id="@+id/gameBoard"
        android:layout_width="0dp"
        android:layout_height="0dp"
        android:layout_marginTop="16dp"
        android:layout_marginBottom="20dp"
        android:minHeight="320dp"
        app:layout_constraintBottom_toBottomOf="parent"
        app:layout_constraintEnd_toEndOf="parent"
        app:layout_constraintStart_toStartOf="parent"
        app:layout_constraintTop_toBottomOf="@id/startButton"
        tools:background="@color/board_background" />

</androidx.constraintlayout.widget.ConstraintLayout>
0dp in ConstraintLayout does not mean “zero size”. It says that the component will get the size determined by its constraints. Therefore gameBoard is stretched between the button and the bottom of the screen.
We build the screen before generating random circles because the coordinates of the Canvas are measured in pixels within the board itself. Only after Android has measured the GameBoardView do we know the width and height within which centers are allowed to be placed.
6. Use binding in the Activity
At the end of onCreate add:
+// View Binding gives us a typed reference generated from activity_main.xml.
+// The button becomes active in the next teaching step, when a playable game exists.
+binding.startButton.setEnabled(false);
The button is visible but disabled. This is a clear intermediate state: we have built the screen and drawing components, but we are not yet promising the user a complete game.
7. Test
Run the app and check for:
- A title, initial time, initial best time, and a disabled Start button.
- A large lavender board.
- Red target in the center with a vertical line and a horizontal line.
- Three green circles.
We now have a graphical foundation that runs on its own. In the next version, we will replace the preview with a real game featuring five random circles, touch, and dragging.
Continue
- CollectCircles 2 - Game State, Random Circles, and Dragging
- Important: Build the graphical interface using the UI editor. Hands-on ConstraintLayout construction
Gemini tutor
Open Gem: CollectCircles Studio: Drawing and Playing to get hints, diagnostic questions and explanations appropriate to the stage you are at.