נבנה מחדש את מונה הנקודות בפרויקט Java חדש. בסוף תוכלו לספור, לעבור למסך הוראות ולחזור לאותו מונה. בדרך תראו איפה מפעילים View Binding, מי מחזיק את סרגל הכלים ואיך היישום יודע איזה מסך להציג.
| זמן מוצע | תוצר שרץ בסוף |
|---|---|
| 45 דקות ראשונות | View Binding פעיל, ומונה ההוספה וההפחתה פועל מתוך MainActivity |
| 45 דקות נוספות | סרגל כלים מופיע, והמונה פועל מתוך FirstFragment |
| 45 דקות נוספות | מסך הוראות נפתח, הכותרת משתנה, ואפשר לחזור למונה בשלוש דרכים |
אם יש לכם שני חלקים של 45 דקות, עצרו אחרי שהמונה פועל מתוך FirstFragment והמשיכו מאותו פרויקט במפגש הבא. אחרי הניווט אפשר להשלים גם את הכפתור הצף והתפריט של התבנית.
חלק א — מפעילים View Binding ומריצים את המונה
1. מתחילים מ־Empty Views Activity
במחשב המעבדה צרו New Project. בחרו Empty Views Activity, תנו לפרויקט את השם ScoreCounter, בחרו Java והשאירו Kotlin DSL בשדה של שפת הגדרות הבנייה. שדה Package name בדוגמה הוא com.example.scorecounter. אם בחרתם חבילה אחרת, השתמשו בה בשורות package, בייבואי ה־binding ובשמות המחלקות שבגרף הניווט. הריצו פעם אחת ובדקו שאתם רואים Hello World!.
2. מחברים את הפריסה לקוד
הסבת הפרויקט ל־View Binding
View Binding יוצר מחלקה עם הפניות ישירות ל־Views שבקובץ ה־XML, כך שלא צריך לחפש כל רכיב שוב באמצעות findViewById. כך הקוד קצר יותר, ושגיאות של מזהה או המרה בין טיפוסים מתגלות מוקדם יותר.
שלב 1 — הפעלת View Binding ב־Gradle
פתחו את build.gradle.kts (Module :app) והוסיפו את buildFeatures:
 android {
     namespace = "com.example.scorecounter"
     compileSdk {
         version = release(37)
     }

+    buildFeatures {
+        viewBinding = true
+    }
+
     defaultConfig {
         ...
     }
 }
לאחר העריכה סנכרנו את ה-Gradle  .
שלב 2 — המרת MainActivity לשימוש ב־Binding
עִרְכוּ את MainActivity.java:
לפני
@Override
protected void onCreate(Bundle savedInstanceState) {
    super.onCreate(savedInstanceState);
    EdgeToEdge.enable(this);

    setContentView(R.layout.activity_main);
    ViewCompat.setOnApplyWindowInsetsListener(findViewById(R.id.main), (v, insets) -> {
        Insets systemBars = insets.getInsets(WindowInsetsCompat.Type.systemBars());
        v.setPadding(systemBars.left, systemBars.top, systemBars.right, systemBars.bottom);
        return insets;
    });
}
אחרי
@Override
protected void onCreate(Bundle savedInstanceState) {
    super.onCreate(savedInstanceState);
    EdgeToEdge.enable(this);
    binding = ActivityMainBinding.inflate(getLayoutInflater());
    setContentView(binding.getRoot());
    ViewCompat.setOnApplyWindowInsetsListener(binding.main, (v, insets) -> {
        Insets systemBars = insets.getInsets(WindowInsetsCompat.Type.systemBars());
        v.setPadding(systemBars.left, systemBars.top, systemBars.right, systemBars.bottom);
        return insets;
    });
}
השדה binding מופיע באדום. בצעו right-click > ShowContextActions ובחרו Create Field:
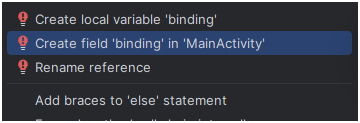 זה יוסיף את השדה וגם יוסיף את ה-import שחסר לנו.
הסבר קצר: binding.getRoot() הוא ה־View הראשי של הפריסה. ב־binding.main ניגשים ל־View עם android:id="@+id/main"; לכן אין עוד צורך ב־findViewById. קוד ה־insets והריווח נשאר ללא שינוי.
ActivityMainBinding נוצרת עבור activity_main.xml. אחרי ההסבה binding.getRoot() נותנת ל־Activity את עץ הפקדים שנוצר מאותו XML. הריצו שוב. אם ActivityMainBinding עדיין מסומנת באדום, בדקו שביצעתם Sync, שהפרויקט נבנה, וש־Android Studio ייבאה את המחלקה מתוך תיקיית databinding של החבילה שלכם.
אותו Hello World! אמור להופיע גם אחרי ההסבה. בדקתם את החיבור החדש לפני שהוספתם אליו את המונה.
3. מחזירים את המונה למסך
ב־app > res > values > strings.xml הוסיפו את הטקסטים של המונה. הכותרת של היישום תשמש אותנו גם כשנוסיף סרגל כלים.
 <resources>
-    <string name="app_name">ScoreCounter</string>
+    <string name="app_name">מונה נקודות</string>
+    <string name="score_add">הוספת נקודה</string>
+    <string name="score_subtract">הפחתת נקודה</string>
 </resources>
ב־app > res > layout > activity_main.xml החליפו את ה־TextView של Hello World ב־LinearLayout של המונה. ה־ConstraintLayout החיצוני עם המזהה main הוא שורש התבנית. ה־LinearLayout הפנימי מסדר את המספר ואת הכפתורים מלמעלה למטה, כמו בשיעור הראשון. הרוחב 0dp יחד עם אילוצי start ו־end מותח את המכל הפנימי בין שני הצדדים.
     tools:context=".MainActivity">

-    <TextView
-        android:layout_width="wrap_content"
+    <LinearLayout
+        android:layout_width="0dp"
         android:layout_height="wrap_content"
-        android:text="Hello World!"
-        app:layout_constraintBottom_toBottomOf="parent"
+        android:gravity="center_horizontal"
+        android:orientation="vertical"
+        android:padding="16dp"
         app:layout_constraintEnd_toEndOf="parent"
         app:layout_constraintStart_toStartOf="parent"
-        app:layout_constraintTop_toTopOf="parent" />
+        app:layout_constraintTop_toTopOf="parent">
+
+        <TextView
+            android:id="@+id/textview_score"
+            android:layout_width="wrap_content"
+            android:layout_height="wrap_content"
+            android:textSize="32sp"
+            tools:text="0" />
+
+        <Button
+            android:id="@+id/button_plus"
+            android:layout_width="wrap_content"
+            android:layout_height="wrap_content"
+            android:text="@string/score_add" />
+
+        <Button
+            android:id="@+id/button_minus"
+            android:layout_width="wrap_content"
+            android:layout_height="wrap_content"
+            android:text="@string/score_subtract" />
+    </LinearLayout>

 </androidx.constraintlayout.widget.ConstraintLayout>
ב־app > kotlin+java > com.example.scorecounter > MainActivity הוסיפו את שדה הניקוד, את שני המאזינים ואת showScore(). כאן המאזינים נרשמים ב־onCreate אחרי שה־Activity כבר קיבלה את הפריסה. מזהה button_plus מופיע בקוד בתור binding.buttonPlus.
     private ActivityMainBinding binding;
+    private int score = 0;

     @Override
             return insets;
         });
+
+        binding.buttonPlus.setOnClickListener(v -> {
+            score++;
+            showScore();
+        });
+        binding.buttonMinus.setOnClickListener(v -> {
+            score--;
+            showScore();
+        });
+        showScore();
+    }
+
+    /** Displays the current score in the score label. */
+    private void showScore() {
+        binding.textviewScore.setText(String.valueOf(score));
     }
 }
הריצו מפתיחה חדשה. לחצו פעמיים על הוספה ופעם על הפחתה. התצוגה אמורה לעבור מ־0 ל־1, ל־2 ואז לחזור ל־1.
חלק ב — סרגל כלים ומסך בתוך Fragment
4. מוסיפים סרגל כלים
ב־activity_main.xml הוסיפו MaterialToolbar מעל המונה. ?attr/actionBarSize נותן לסרגל את הגובה שמוגדר בערכת העיצוב. הצמידו את ראש ה־LinearLayout לתחתית הסרגל. כך הסרגל והמונה מקבלים מקום משלהם על המסך.
     tools:context=".MainActivity">

+    <com.google.android.material.appbar.MaterialToolbar
+        android:id="@+id/toolbar"
+        android:layout_width="0dp"
+        android:layout_height="?attr/actionBarSize"
+        app:layout_constraintEnd_toEndOf="parent"
+        app:layout_constraintStart_toStartOf="parent"
+        app:layout_constraintTop_toTopOf="parent" />
+
     <LinearLayout
         android:layout_width="0dp"
         app:layout_constraintEnd_toEndOf="parent"
         app:layout_constraintStart_toStartOf="parent"
-        app:layout_constraintTop_toTopOf="parent">
+        app:layout_constraintTop_toBottomOf="@id/toolbar">

         <TextView
ב־MainActivity חברו את הסרגל בעזרת setSupportActionBar אחרי setContentView. תבנית הפרויקט משתמשת בערכת עיצוב מסוג NoActionBar, ולכן זה הסרגל שיופיע למעלה.
         binding = ActivityMainBinding.inflate(getLayoutInflater());
         setContentView(binding.getRoot());
+        setSupportActionBar(binding.toolbar);
         ViewCompat.setOnApplyWindowInsetsListener(binding.main, (v, insets) -> {
             Insets systemBars = insets.getInsets(WindowInsetsCompat.Type.systemBars());
בדיקה בהרצה. ודאו שהכותרת מונה נקודות מופיעה למעלה, והמספר וכפתורי המונה מופיעים מתחתיה.
5. מעבירים את המונה ל־Fragment
ה־Activity מחזיקה את סרגל הכלים ואת המקום שבו יוצג המסך. נכניס למקום הזה NavHostFragment, שמציג את היעד הנוכחי מתוך גרף ניווט. כרגע יהיה לגרף יעד אחד, FirstFragment.
flowchart LR
    A[MainActivity] --> T[Toolbar]
    A --> H[NavHostFragment]
    H --> F[FirstFragment]
ב־Gradle Scripts > libs.versions.toml הוסיפו גרסה משותפת לשתי ספריות הניווט. ספריית navigation-fragment מספקת את המארח ואת הניווט בין Fragments. ספריית navigation-ui מחברת את גרף הניווט לסרגל הכלים.
 constraintlayout = "2.2.2"

+navigation = "2.10.2"
+
 [libraries]
 junit = { group = "junit", name = "junit", version.ref = "junit" }
 constraintlayout = { group = "androidx.constraintlayout", name = "constraintlayout", version.ref = "constraintlayout" }

+navigation-fragment = { group = "androidx.navigation", name = "navigation-fragment", version.ref = "navigation" }
+navigation-ui = { group = "androidx.navigation", name = "navigation-ui", version.ref = "navigation" }
+
 [plugins]
 android-application = { id = "com.android.application", version.ref = "agp" }
-
ב־Gradle Scripts > build.gradle.kts (Module :app) הוסיפו את שתי התלויות ובצעו Sync.
     implementation(libs.constraintlayout)
     implementation(libs.material)
+    implementation(libs.navigation.fragment)
+    implementation(libs.navigation.ui)
     testImplementation(libs.junit)
     androidTestImplementation(libs.espresso.core)
ב־app > res > layout צרו את fragment_first.xml. זהו ה־LinearLayout של המונה בתוך NestedScrollView. מזהי הפקדים נשארים זהים, ולכן אותן פעולות לחיצה ימשיכו להתאים למסך.
<?xml version="1.0" encoding="utf-8"?>
<androidx.core.widget.NestedScrollView xmlns:android="http://schemas.android.com/apk/res/android"
    xmlns:tools="http://schemas.android.com/tools"
    android:layout_width="match_parent"
    android:layout_height="match_parent">

    <LinearLayout
        android:layout_width="match_parent"
        android:layout_height="wrap_content"
        android:gravity="center_horizontal"
        android:orientation="vertical"
        android:padding="16dp">

        <TextView
            android:id="@+id/textview_score"
            android:layout_width="wrap_content"
            android:layout_height="wrap_content"
            android:textSize="32sp"
            tools:text="0" />

        <Button
            android:id="@+id/button_plus"
            android:layout_width="wrap_content"
            android:layout_height="wrap_content"
            android:text="@string/score_add" />

        <Button
            android:id="@+id/button_minus"
            android:layout_width="wrap_content"
            android:layout_height="wrap_content"
            android:text="@string/score_subtract" />
    </LinearLayout>
</androidx.core.widget.NestedScrollView>
ב־app > kotlin+java > com.example.scorecounter צרו מחלקת Java בשם FirstFragment. ה־Fragment יוצרת את הפריסה שלה ב־onCreateView, מחברת את הפקדים כשהם מוכנים ב־onViewCreated, ומשחררת את ההפניות אליהם ב־onDestroyView. שימו לב ששם ה־binding נגזר מהקובץ fragment_first.xml.
package com.example.scorecounter;

import android.os.Bundle;
import android.view.LayoutInflater;
import android.view.View;
import android.view.ViewGroup;

import androidx.annotation.NonNull;
import androidx.fragment.app.Fragment;

import com.example.scorecounter.databinding.FragmentFirstBinding;

public class FirstFragment extends Fragment {

    private FragmentFirstBinding binding;
    private int score = 0;

    /** Creates the views for this instance of the counter screen. */
    @Override
    public View onCreateView(@NonNull LayoutInflater inflater, ViewGroup container,
                             Bundle savedInstanceState) {
        binding = FragmentFirstBinding.inflate(inflater, container, false);
        return binding.getRoot();
    }

    /** Connects the buttons and displays the current score after the views are ready. */
    @Override
    public void onViewCreated(@NonNull View view, Bundle savedInstanceState) {
        super.onViewCreated(view, savedInstanceState);
        binding.buttonPlus.setOnClickListener(v -> {
            score++;
            showScore();
        });
        binding.buttonMinus.setOnClickListener(v -> {
            score--;
            showScore();
        });
        showScore();
    }

    /** Displays the current score in the score label. */
    private void showScore() {
        binding.textviewScore.setText(String.valueOf(score));
    }

    /** Releases references to the old views when the screen's view is destroyed. */
    @Override
    public void onDestroyView() {
        super.onDestroyView();
        binding = null;
    }
}
משתנה score שייך למונה. משתנה binding שייך לפקדים שנוצרו עבור המסך הנוכחי. כשמנקים את ה־binding, מפסיקים להחזיק הפניות לפקדים הישנים. תצוגה חדשה תוכל להציג שוב את ערכו הנוכחי של score.
ב־app > res צרו תיקיית משאבים מסוג navigation, ובה את הקובץ nav_graph.xml. startDestination קובע איזה יעד יוצג בפתיחה. android:name מצביע על המחלקה של המסך, ו־android:label מספק את הכותרת שלו לסרגל.
<?xml version="1.0" encoding="utf-8"?>
<navigation xmlns:android="http://schemas.android.com/apk/res/android"
    xmlns:app="http://schemas.android.com/apk/res-auto"
    android:id="@+id/nav_graph"
    app:startDestination="@id/firstFragment">

    <fragment
        android:id="@+id/firstFragment"
        android:name="com.example.scorecounter.FirstFragment"
        android:label="@string/app_name" />
</navigation>
ב־activity_main.xml החליפו את כל ה־LinearLayout הפנימי של המונה, שנמצא אחרי הסרגל, במארח הבא. השינוי הזה מעביר את הצגת המונה ל־FirstFragment.
    <androidx.fragment.app.FragmentContainerView
        android:id="@+id/nav_host"
        android:name="androidx.navigation.fragment.NavHostFragment"
        android:layout_width="0dp"
        android:layout_height="0dp"
        app:defaultNavHost="true"
        app:layout_constraintBottom_toBottomOf="parent"
        app:layout_constraintEnd_toEndOf="parent"
        app:layout_constraintStart_toStartOf="parent"
        app:layout_constraintTop_toBottomOf="@id/toolbar"
        app:navGraph="@navigation/nav_graph" />
ב־MainActivity.java העבירו את האחריות ללחיצות ולניקוד ל־FirstFragment על ידי הסרת הקוד הכפול מה־Activity. הוסיפו את החיבור של NavController לסרגל הכלים. getNavController() מקבלת את מנהל הניווט מתוך המארח שהגדרתם ב־XML.
 import androidx.core.view.ViewCompat;
 import androidx.core.view.WindowInsetsCompat;
+import androidx.navigation.NavController;
+import androidx.navigation.fragment.NavHostFragment;
+import androidx.navigation.ui.AppBarConfiguration;
+import androidx.navigation.ui.NavigationUI;

 import com.example.scorecounter.databinding.ActivityMainBinding;
     private ActivityMainBinding binding;
-    private int score = 0;
+    private AppBarConfiguration appBarConfiguration;

     @Override
         });

-        binding.buttonPlus.setOnClickListener(v -> {
-            score++;
-            showScore();
-        });
-        binding.buttonMinus.setOnClickListener(v -> {
-            score--;
-            showScore();
-        });
-        showScore();
+        NavController navController = getNavController();
+        appBarConfiguration = new AppBarConfiguration.Builder(navController.getGraph()).build();
+        NavigationUI.setupActionBarWithNavController(this, navController, appBarConfiguration);
     }

-    /** Displays the current score in the score label. */
-    private void showScore() {
-        binding.textviewScore.setText(String.valueOf(score));
+    /** Returns the controller from the NavHostFragment declared in activity_main.xml. */
+    private NavController getNavController() {
+        NavHostFragment host = (NavHostFragment) getSupportFragmentManager()
+                .findFragmentById(R.id.nav_host);
+        return host.getNavController();
     }
 }
אם פתיחת האפליקציה נכשלת אחרי הוספת המארח, בדקו ב־Logcat את השגיאה הראשונה שנוגעת לפרויקט. ודאו ששמו המלא של FirstFragment בגרף זהה לשורת package ולשם המחלקה שיצרתם.
הריצו שוב. סרגל הכלים והמונה אמורים לפעול בדיוק כמו בנקודת הבדיקה הקודמת. הפעם FirstFragment מחזיקה את הניקוד ואת כפתורי ההוספה וההפחתה. זו נקודת עצירה טובה.
חלק ג — מסך שני, מעבר וחזרה
6. יוצרים את מסך ההוראות
הוסיפו ל־strings.xml את הכותרת והטקסט של מסך ההוראות ואת תווית כפתור החזרה.
     <string name="score_add">הוספת נקודה</string>
     <string name="score_subtract">הפחתת נקודה</string>
+    <string name="rules_title">איך משחקים</string>
+    <string name="rules_text">לחצו על הוספת נקודה כדי להעלות את הניקוד ועל הפחתת נקודה כדי להוריד אותו.</string>
+    <string name="return_to_score">חזרה למונה</string>
 </resources>
צרו את fragment_second.xml ב־app > res > layout ואת SecondFragment.java בחבילה של הפרויקט. popBackStack() סוגרת את היעד הנוכחי וחוזרת ליעד שכבר קיים במחסנית. במקרה שלנו זה המונה שממנו הגענו.
<?xml version="1.0" encoding="utf-8"?>
<LinearLayout xmlns:android="http://schemas.android.com/apk/res/android"
    android:layout_width="match_parent"
    android:layout_height="match_parent"
    android:orientation="vertical"
    android:padding="16dp">

    <TextView
        android:layout_width="match_parent"
        android:layout_height="wrap_content"
        android:text="@string/rules_text" />

    <Button
        android:id="@+id/button_back"
        android:layout_width="wrap_content"
        android:layout_height="wrap_content"
        android:layout_marginTop="16dp"
        android:text="@string/return_to_score" />

</LinearLayout>
package com.example.scorecounter;

import android.os.Bundle;
import android.view.LayoutInflater;
import android.view.View;
import android.view.ViewGroup;

import androidx.annotation.NonNull;
import androidx.fragment.app.Fragment;
import androidx.navigation.fragment.NavHostFragment;

import com.example.scorecounter.databinding.FragmentSecondBinding;

public class SecondFragment extends Fragment {

    private FragmentSecondBinding binding;

    /** Creates the views for the instructions screen. */
    @Override
    public View onCreateView(@NonNull LayoutInflater inflater, ViewGroup container,
                             Bundle savedInstanceState) {
        binding = FragmentSecondBinding.inflate(inflater, container, false);
        return binding.getRoot();
    }

    /** Returns to the counter that is already on the navigation back stack. */
    @Override
    public void onViewCreated(@NonNull View view, Bundle savedInstanceState) {
        super.onViewCreated(view, savedInstanceState);
        binding.buttonBack.setOnClickListener(v ->
                NavHostFragment.findNavController(this).popBackStack());
    }

    /** Releases references to the views of the instructions screen. */
    @Override
    public void onDestroyView() {
        super.onDestroyView();
        binding = null;
    }
}
7. מחברים את היעדים ואת חץ החזרה
ב־nav_graph.xml הוסיפו את היעד השני ופעולה שמובילה אליו מהיעד הראשון. המזהה של ה־action ישמש את הקוד של כפתור ההוראות.
         android:id="@+id/firstFragment"
         android:name="com.example.scorecounter.FirstFragment"
-        android:label="@string/app_name" />
+        android:label="@string/app_name">
+        <action
+            android:id="@+id/action_first_to_second"
+            app:destination="@id/secondFragment" />
+    </fragment>
+
+    <fragment
+        android:id="@+id/secondFragment"
+        android:name="com.example.scorecounter.SecondFragment"
+        android:label="@string/rules_title" />
 </navigation>
ב־fragment_first.xml הוסיפו את כפתור איך משחקים אחרי כפתור ההפחתה. ב־FirstFragment.java חברו אותו בעזרת navigate.
             android:layout_height="wrap_content"
             android:text="@string/score_subtract" />
+
+        <Button
+            android:id="@+id/button_rules"
+            android:layout_width="wrap_content"
+            android:layout_height="wrap_content"
+            android:layout_marginTop="16dp"
+            android:text="@string/rules_title" />
     </LinearLayout>
 </androidx.core.widget.NestedScrollView>
 import androidx.annotation.NonNull;
 import androidx.fragment.app.Fragment;
+import androidx.navigation.fragment.NavHostFragment;

 import com.example.scorecounter.databinding.FragmentFirstBinding;
             showScore();
         });
+        binding.buttonRules.setOnClickListener(v ->
+                NavHostFragment.findNavController(this).navigate(R.id.action_first_to_second));
         showScore();
     }
ב־MainActivity.java הוסיפו את onSupportNavigateUp() כדי שחץ Up בסרגל יפעיל את מנהל הניווט. שם היעד הנוכחי מגיע מה־label בגרף.
     }

+    /** Handles the app bar's Up arrow using the same navigation graph as Back. */
+    @Override
+    public boolean onSupportNavigateUp() {
+        return NavigationUI.navigateUp(getNavController(), appBarConfiguration)
+                || super.onSupportNavigateUp();
+    }
+
     /** Returns the controller from the NavHostFragment declared in activity_main.xml. */
     private NavController getNavController() {
הריצו ובדקו. העלו את המונה ל־2, פתחו איך משחקים ובדקו שהכותרת משתנה. חזרו למונה בעזרת הכפתור שבמסך וודאו שעדיין מוצג 2. חזרו על הבדיקה עם חץ Up בסרגל ועם Back של Android. לחיצה נוספת על הוספה אמורה להציג 3.
שאלת הבנה על החזרה למונה
למה במסך ההוראות קראנו ל־popBackStack()? המונה שממנו הגענו כבר נמצא במחסנית. סגירת מסך ההוראות מחזירה אותנו אליו. מעבר נוסף ליעד של המונה היה פותח מופע נוסף ומוסיף תחנה למחסנית.
השלמה — תפריט וכפתור צף
כמו בתבנית Basic Views Activity, סרגל הכלים יכול להציע פעולה בתפריט, וה־Activity יכולה להציג כפתור צף מעל המסך הנוכחי. כאן אודות יציג הודעה קצרה, והכפתור הצף יזכיר איך מפעילים את המונה.
ב־strings.xml הוסיפו את התוויות וההודעות. צרו תיקיית משאבים מסוג menu ובתוכה את menu_main.xml. הערך never מציג את הפריט בתוך תפריט שלוש הנקודות.
     <string name="rules_text">לחצו על הוספת נקודה כדי להעלות את הניקוד ועל הפחתת נקודה כדי להוריד אותו.</string>
     <string name="return_to_score">חזרה למונה</string>
+    <string name="help_button">עזרה קצרה</string>
+    <string name="help_message">פלוס מוסיף נקודה ומינוס מפחית נקודה.</string>
+    <string name="menu_about">אודות</string>
+    <string name="about_message">מונה נקודות — תרגיל Android לכיתה י״א</string>
 </resources>
<?xml version="1.0" encoding="utf-8"?>
<menu xmlns:android="http://schemas.android.com/apk/res/android"
    xmlns:app="http://schemas.android.com/apk/res-auto">
    <item
        android:id="@+id/action_about"
        android:title="@string/menu_about"
        app:showAsAction="never" />
</menu>
ב־activity_main.xml הוסיפו FloatingActionButton אחרי המארח. contentDescription נותן לכפתור שם גם עבור קוראי מסך. ב־MainActivity.java חברו את התפריט ואת הכפתור הצף. setAnchorView ממקמת את ה־Snackbar מעל הכפתור.
         app:navGraph="@navigation/nav_graph" />

+
+    <com.google.android.material.floatingactionbutton.FloatingActionButton
+        android:id="@+id/fab"
+        android:layout_width="wrap_content"
+        android:layout_height="wrap_content"
+        android:layout_margin="16dp"
+        android:contentDescription="@string/help_button"
+        app:layout_constraintBottom_toBottomOf="parent"
+        app:layout_constraintEnd_toEndOf="parent"
+        app:srcCompat="@android:drawable/ic_menu_help" />
 </androidx.constraintlayout.widget.ConstraintLayout>
 import android.os.Bundle;
+import android.view.Menu;
+import android.view.MenuItem;

 import androidx.activity.EdgeToEdge;
 import com.example.scorecounter.databinding.ActivityMainBinding;
+import com.google.android.material.snackbar.Snackbar;
 public class MainActivity extends AppCompatActivity {
         appBarConfiguration = new AppBarConfiguration.Builder(navController.getGraph()).build();
         NavigationUI.setupActionBarWithNavController(this, navController, appBarConfiguration);
+
+        binding.fab.setOnClickListener(view -> showMessage(R.string.help_message));
+    }
+
+    /** Adds the About item to the toolbar's overflow menu. */
+    @Override
+    public boolean onCreateOptionsMenu(Menu menu) {
+        getMenuInflater().inflate(R.menu.menu_main, menu);
+        return true;
+    }
+
+    /** Shows the app's About message when its menu item is selected. */
+    @Override
+    public boolean onOptionsItemSelected(MenuItem item) {
+        if (item.getItemId() == R.id.action_about) {
+            showMessage(R.string.about_message);
+            return true;
+        }
+        return super.onOptionsItemSelected(item);
+    }
+
+    /** Shows a short message above the floating action button. */
+    private void showMessage(int message) {
+        Snackbar.make(binding.getRoot(), message, Snackbar.LENGTH_LONG)
+                .setAnchorView(binding.fab).show();
     }
בדיקה בהרצה. לחצו על הכפתור הצף ובדקו שמופיעה שורת העזרה. פתחו את תפריט שלוש הנקודות ובחרו אודות. נסו את שתי הפעולות גם במסך ההוראות.
להעמקה קראו על View Binding בתיעוד Android ועל החיבור בין סרגל הכלים לגרף הניווט.